


อันนี้ Blog นี้มา Recap Step สำหรับ Update Postgres 17 > 18 Docker Note ผมใช่ในสาย Dev นะ
Table of Contents
Env เดิม
สำหรับผมใช้ docker compose ตามนี้เลยครับ
services:
  postgres:
    image: postgres:17
    container_name: postgres17_dev
    restart: always
    environment:
      POSTGRES_USER: postgres
      POSTGRES_PASSWORD: postgres
      POSTGRES_DB: mydatabase
    ports:
      - "25432:5432"
    volumes:
      - ./postgres_data:/var/lib/postgresql/data
    deploy:
      resources:
        limits:
          #cpus: "0.5"         # Comment this line, if use on Synology NAS, NanoCPUs can not be set
          memory: "2G"
        reservations:
          #cpus: "0.25"        # Comment this line, if use on Synology NAS, NanoCPUs can not be set
          memory: "256M"
    healthcheck:
      test: ["CMD-SHELL", "pg_isready -U postgres"]
      interval: 10s
      timeout: 5s
      retries: 5

  pgadmin:
    image: dpage/pgadmin4
    container_name: pgadmin4_dev
    restart: always
    environment:
      PGADMIN_DEFAULT_EMAIL: [email protected]
      PGADMIN_DEFAULT_PASSWORD: admin
      PGADMIN_LISTEN_PORT: 5050
    ports:
      - "28080:5050"
    depends_on:
      - postgres
    volumes:
      - ./pgadmin_data:/var/lib/pgadmin
    deploy:
      resources:
        limits:
          #cpus: "0.5"         # Comment this line, if use on Synology NAS, NanoCPUs can not be set
          memory: "2G"
        reservations:
          #cpus: "0.25"        # Comment this line, if use on Synology NAS, NanoCPUs can not be set
          memory: "256M"
แล้วที่นี่มีการ map data จาก /var/lib/postgresql/data มาที่ host ./postgres_data ข้างใน มีของตามนี้
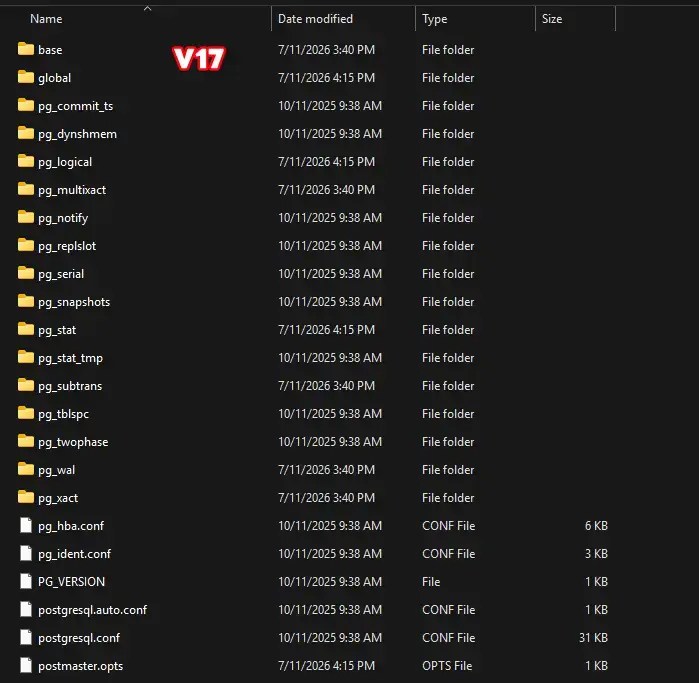
GoTo PG18
เนื่องจาก Postgres 18+ บน Docker เปลี่ยนโครงสร้างการเก็บไฟล์แบบแยกเวอร์ชัน มันมี 3
- ท่า dump ออกมา restore แล้ว
- ใช้ Image ช่วย Upgrade
- pg_upgrade แบบ manual ดิบเถื่อนเกินไป 555 เจอ Error Permission เยอะ
- ทำ dump ออกมา restore แล้ว
อันนี้ Step แบบ Classic เลยครับ
- Dump Data ออกมา
# dump
docker exec -t <container_name> pg_dumpall -U postgres > full_cluster_dump.sql

docker compose down

# backup data path
mv ./postgres_data ./postgres_data_17
- ปรับแก้ docker ให้ใช้เป็น image: postgres:18 และแก้ mount path จาก ./postgres_data:/var/lib/postgresql/data เป็น ./postgres_data:/var/lib/postgresql/
- จากนั้น Start Compose > Restore Dump > Update query planner stats
# Start container it will cluster at /var/lib/postgresql/18/docker
docker compose up -d

# Restore data
docker cp full_cluster_dump.sql <container_name>:/tmp/
docker exec -i <container_name> psql -U postgres -f /tmp/full_cluster_dump.sql

# RUN ANALYZE Update query planner stats (Restore Operation not create)
docker exec -i <container_name> vacuumdb --all --analyze-in-stages -U postgres
- ทดสอบ ถ้าไม่ได้ แก้ pg_hba.conf ถ้าลอง Connect เข้ามาไม่ได้
- autoupgrade image
อันนี้มีหลายค่าย หลักการเหมือนกัน
- backup data path
- อาจจะต้องมาจัด เราจึงต้องย้ายไฟล์ V17 เดิมเข้าไปให้ตรงโครงสร้างเพื่อ Upgrade
- สร้าง Path: postgres_data\17\data\
- ย้ายไฟล์ DB เดิม (base, pg_*, *.conf) เข้าไปอยู่ในโฟลเดอร์ data นั้น - run autoupgrade image อันนี้ 2 ค่าย
- https://github.com/pgautoupgrade/docker-pgautoupgrade อันนี้เค้าบอกสำหรับ dev ฝากใน CI/CD
- https://github.com/tianon/docker-postgres-upgrade มันเอา pg_upgrade มาทำ และมันจัดการปัญหาหงุดหงิดเรื่อง permission ด้วย
# pgautoupgrade/docker-pgautoupgrade
docker run --name pgauto -it \
	--mount type=bind,source=/path/to/your/database/directory,target=/var/lib/postgresql/data \
	-e POSTGRES_PASSWORD=password \
	-e PGAUTO_ONESHOT=yes \
	<NAME_OF_THE_PGAUTOUPGRADE_IMAGE>
# tianon/docker-postgres-upgrade
OLD=17
NEW=18
docker run --rm \
  --mount "type=bind,src=/path/pg17,dst=/var/lib/postgresql/$OLD/docker" \
  --mount "type=bind,src=/path/pg18,dst=/var/lib/postgresql/$NEW/docker" \
  --env "PGDATAOLD=/var/lib/postgresql/$OLD/docker" \
  --env "PGDATANEW=/var/lib/postgresql/$NEW/docker" \
  tianon/postgres-upgrade:$OLD-to-$NEW --link
- Update เสร็จ Start docker compose ตัวแก้เป็น V18 แล้วได้เลย
อ๋อ compose ตัวเต็มที่ผมใช้ใน dev - line ที่ปรับตาม highlight
services:
  postgres:
    image: postgres:18
    container_name: postgres18_dev
    restart: always
    environment:
      POSTGRES_USER: postgres
      POSTGRES_PASSWORD: postgres
      POSTGRES_DB: mydatabase
    ports:
      - "25432:5432"
    volumes:
      #- ./postgres_data:/var/lib/postgresql/data
      - ./postgres_data:/var/lib/postgresql/
    deploy:
      resources:
        limits:
          #cpus: "0.5"         # Comment this line, if use on Synology NAS, NanoCPUs can not be set
          memory: "2G"
        reservations:
          #cpus: "0.25"        # Comment this line, if use on Synology NAS, NanoCPUs can not be set
          memory: "256M"
    healthcheck:
      test: ["CMD-SHELL", "pg_isready -U postgres"]
      interval: 10s
      timeout: 5s
      retries: 5

  pgadmin:
    image: dpage/pgadmin4
    container_name: pgadmin4_dev
    restart: always
    environment:
      PGADMIN_DEFAULT_EMAIL: [email protected]
      PGADMIN_DEFAULT_PASSWORD: admin
      PGADMIN_LISTEN_PORT: 5050
    ports:
      - "28080:5050"
    depends_on:
      - postgres
    volumes:
      - ./pgadmin_data:/var/lib/pgadmin
    deploy:
      resources:
        limits:
          #cpus: "0.5"         # Comment this line, if use on Synology NAS, NanoCPUs can not be set
          memory: "2G"
        reservations:
          #cpus: "0.25"        # Comment this line, if use on Synology NAS, NanoCPUs can not be set
          memory: "256M"
- ทดสอบ ถ้าไม่ได้ แก้ pg_hba.conf ถ้าลอง Connect เข้ามาไม่ได้
tianon/docker-postgres-upgrade ทดเพิ่ม
จริงมันเป็น Solution ให้มาเขียน Blog ผมไม่อยาก dump db ที่ docker dev มันเยอะ เลยมาหาดูครับ เจอปัญหาเยอะ
docker exec -it -u postgres postgres18_dev pg_upgrade -b /usr/lib/postgresql/17/bin -B /usr/lib/postgresql/18/bin -d /var/lib/postgresql/17 -D /var/lib/postgresql/18
เจออะไรแบบนี้
could not create directory "/var/lib/postgresql/18/pg_upgrade_output.d": Permission denied
Failure, exiting

could not open version file "/var/lib/postgresql/17/data/PG_VERSION": No such file or directory
Failure, exiting

-- Ver17 (No Use data checksums) > 18
old cluster does not use data checksums but the new one does
สรุปต้องมาใช้ tianon/docker-postgres-upgrade และเอา Check Sum ออก จะได้ผลลัพธ์ตามนี้
PS C:\Container\pg_stack> docker run --rm `
>>   -v "${PWD}/postgres_data:/var/lib/postgresql" `
>>   -e POSTGRES_INITDB_ARGS="--no-data-checksums" `
>>   tianon/postgres-upgrade:17-to-18
The files belonging to this database system will be owned by user "postgres".
This user must also own the server process.

The database cluster will be initialized with locale "en_US.utf8".
The default database encoding has accordingly been set to "UTF8".
The default text search configuration will be set to "english".

Data page checksums are disabled.

fixing permissions on existing directory /var/lib/postgresql/18/docker ... ok
creating subdirectories ... ok
selecting dynamic shared memory implementation ... posix
selecting default "max_connections" ... 100
selecting default "shared_buffers" ... 128MB
selecting default time zone ... Etc/UTC
creating configuration files ... ok
running bootstrap script ... ok
performing post-bootstrap initialization ... ok
syncing data to disk ... ok


Success. You can now start the database server using:

    pg_ctl -D /var/lib/postgresql/18/docker -l logfile start

initdb: warning: enabling "trust" authentication for local connections
initdb: hint: You can change this by editing pg_hba.conf or using the option -A, or --auth-local and --auth-host, the next time you run initdb.
Performing Consistency Checks
-----------------------------
Checking cluster versions                                     ok
Checking database connection settings                         ok
Checking database user is the install user                    ok
Checking for prepared transactions                            ok
Checking for contrib/isn with bigint-passing mismatch         ok
Checking for valid logical replication slots                  ok
Checking for subscription state                               ok
Checking data type usage                                      ok
Checking for objects affected by Unicode update               ok
Checking for not-null constraint inconsistencies              ok
Creating dump of global objects                               ok
Creating dump of database schemas                             ok
Checking for presence of required libraries                   ok
Checking database user is the install user                    ok
Checking for prepared transactions                            ok
Checking for new cluster tablespace directories               ok

If pg_upgrade fails after this point, you must re-initdb the
new cluster before continuing.

Performing Upgrade
------------------
Setting locale and encoding for new cluster                   ok
Analyzing all rows in the new cluster                         ok
Freezing all rows in the new cluster                          ok
Deleting files from new pg_xact                               ok
Copying old pg_xact to new server                             ok
Setting oldest XID for new cluster                            ok
Setting next transaction ID and epoch for new cluster         ok
Deleting files from new pg_multixact/offsets                  ok
Copying old pg_multixact/offsets to new server                ok
Deleting files from new pg_multixact/members                  ok
Copying old pg_multixact/members to new server                ok
Setting next multixact ID and offset for new cluster          ok
Resetting WAL archives                                        ok
Setting frozenxid and minmxid counters in new cluster         ok
Restoring global objects in the new cluster                   ok
Restoring database schemas in the new cluster                 ok
Copying user relation files                                   ok
Setting next OID for new cluster                              ok
Sync data directory to disk                                   ok
Creating script to delete old cluster                         ok
Checking for extension updates                                ok

Upgrade Complete
----------------
Some statistics are not transferred by pg_upgrade.
Once you start the new server, consider running these two commands:
    /usr/lib/postgresql/18/bin/vacuumdb --all --analyze-in-stages --missing-stats-only
    /usr/lib/postgresql/18/bin/vacuumdb --all --analyze-only
Running this script will delete the old cluster's data files:
    ./delete_old_cluster.sh
แก้ pg_hba.conf ถ้าลอง Connect เข้ามาไม่ได้
สำหรับ Postgres V18 ปรับจะไม่ให้ IP ข้างนอกเข้ามาเชื่อมได้ง่ายๆ ถ้าลอง Connect จาก ทำให้ pgAdmin ติด Error

- การแก้ เปิดไฟล์
<pg_data>\18\เช่นdocker\pg_hba.confpostgres_data\18\docker\pg_hba.conf - เพิ่มบรรทัดนี้ไว้ล่างสุดของ เพื่อให้ Docker คุยกันได้ ตั้งค่าแบบ Dev ใช้จริงตรวจด้วย
host all all all trust
# TYPE  DATABASE        USER            ADDRESS                 METHOD

# "local" is for Unix domain socket connections only
local   all             all                                     trust
# IPv4 local connections:
host    all             all             127.0.0.1/32            trust
# IPv6 local connections:
host    all             all             ::1/128                 trust
# Allow replication connections from localhost, by a user with the
# replication privilege.
local   replication     all                                     trust
host    replication     all             127.0.0.1/32            trust
host    replication     all             ::1/128                 trust
host    all             all             all                     trust
สำหรับใครที่เอาไปใช้ที่ prod ต้องไปรับและเพิ่ม Step เช่น
- การมี Backup ไว้กันเหนียว - dump/restore มี downtime
- ตรวจ release notes ของ Postgres ที่จะไป เช่น V18 มีปรับเรื่อง path /
- และ เช็ค extension/driver ที่ใช้ว่า compatible ที่ไม่อยุ่ใน core อย่าง pgvector, postgis เป็นต้น
- ซ้อมก่อนทำจริง จะได้รู้ว่า App ยังทำงานได้ปกติ และระวัง volume path พำพลาดทับของเดิมเลย

