สัปดาห์นี้ก็ Store Data ล้วนๆ
Table of Contents
สำหรับ part ก่อนหน้า
- The Cloud Camp Week#06 (K8S Part1:Overview) | naiwaen@DebuggingSoft
- The Cloud Camp Week#07 (K8S Part2:K8S Object) | naiwaen@DebuggingSoft
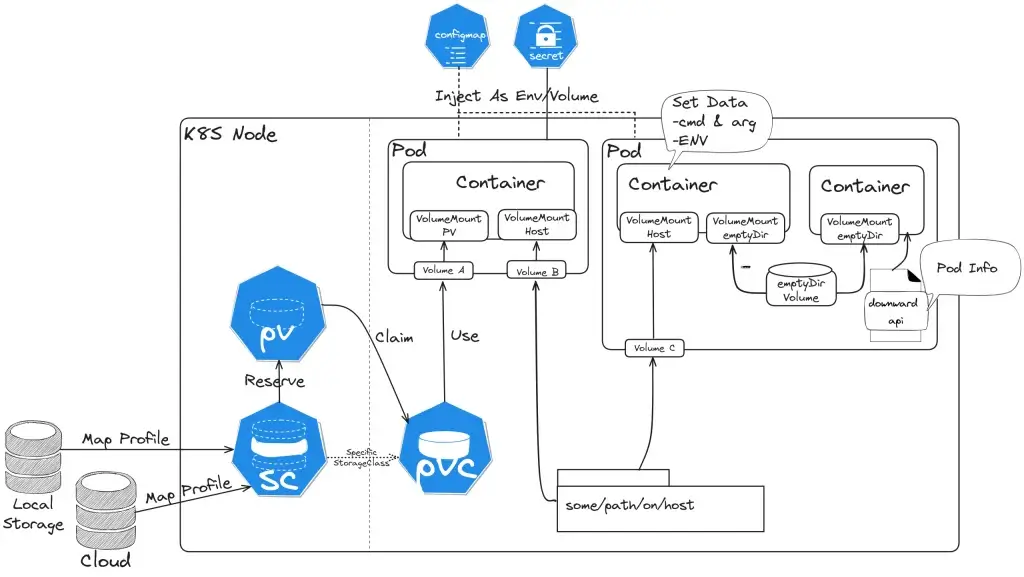
Volumes
ก่อนที่จะมาเรื่องใหม่ต้องมา Recap ก่อนจาก Part 1 ตัว Pod มันเก็บข้อมูลได้นะ แต่จะอยู่ชั่วคราว (ephemeral) เท่านั้น ดังนั้นเราจะพบ non-trivial problems ของ App ได้ ดังนี้
- ถ้า Pod ตาย Data ที่อยู่ในนั้นจะหายไปด้วย
- ถ้า Pod นั้นมี Container 2 ตัว จะแชร์ Data ระหว่าง Container อย่างไร ?
default pod ไม่ได้แชร์ไฟล์กันระหว่าง container นะ
ดังนั้น Volume จะมาช่วยแก้ปัญหาพวกนี้ แต่ควรมาเข้าใจตัว YAML Pattern กันก่อน
YAML Pattern
- Pod Level เชื่อม Volume
 volumes:
  - name: cache-volume  #ชื่อ Volume
    hostPath:           #ชนิดของ Volume ในที่นี้จะเป็น hostPath
      #ส่วนข้างล่างนี้จะเป็น Config ของแต่ละ Type ที่ทำได้ตาม Spec เช่น hostPath มี path/type
      #หรือ emptyDir จะมี เช่น sizeLimit / medium
      #หรือ persistentVolumeClaim เช่น claimName
      path: /tmp
      type: Directory
- Container Level เอา Volume จาก Pod มาใช้งาน
   volumeMounts:
    - mountPath: /tmp/cache    #Path ใน Container
      name: cache-volume       #ชื่อ Volume ที่ประกาศไว้ใน Pod Level
Volume Type ที่เด่นๆ ดังนี้
- hostPath
แบบนี้จะคล้ายกับตัว docker volume โดย Volume แบบ hostPath จะเอา path ของ node ที่ pod Deploy อยู่มา map กับ pod
apiVersion: v1
kind: Pod
metadata:
  creationTimestamp: null
  labels:
    run: mcss
  name: mcss
spec:
  containers:
  - image: nginx
    name: mcss
    resources: {}
    volumeMounts:
    - mountPath: /tmp/cache
      name: cache-volume
  - image: pingkunga/service-test
    name: c2
    volumeMounts:
    - mountPath: /tmp/cache
      name: cache-volume
  dnsPolicy: ClusterFirst
  restartPolicy: Always
  volumes:
  - name: cache-volume
    hostPath:
      # directory location on host
      path: /tmp
      # this field is optional
      type: Directory
status: {}
- Key Config
- Path: ที่อยู่จริงๆบน Node ที่เราจะเชื่อมเข้ามา
- Type: มันจะมีหลายแบบต้องระวังการเรียกใช้
>> FileOrCreate: มันจะไม่สร้าง Directory มาให้นะ
>> File: ต้องมีไฟล์นั้นจริงๆ
>> DirectoryOrCreate / Directory ล้อกันมา และะมีแบบอื่นๆตาม Link
Ref: Volumes-HostPath | Kubernetes - Sample Use-Case
- ถ้าใช้ docker อาจจะต้องเข้าไป Config Path /var/lib/docker
- เปิดช่องให้ใน Tools monitor เข้ามาดูข้อมูล อย่างตัว google/cadvisor: Analyzes resource usage and performance characteristics of running containers. (github.com)
- สร้าง Path หลอก ในกรณีที่ Container มันต้องการใช้ตอน Start - Limitation
- ถ้า pod ตาย แล้ว kube-scheduler ไปสร้าง pod ใหม่ที่ node data จะหาย อารมณ์ประมาณวิญญาณเข้าผิดร่าง
แก้โดยใช้ตัว network path มา map แทน nfs
- Security Issue: ถ้าจำเป้นต้องใช้ hostPath ให้ Scope ที่เล็ก file / directory และ readOnly access ด้วย //มันแก้จาก node มาใส่ได้
- emptyDir
สร้าง Volume เปล่าๆ ผูกกับ pod (เกิด และตายไปด้วยกัน) ไม่จำเป็นต้องใช้ Path ของ Node แบบ hostPath อาจจะใช้ memory มา config ก็ได้ โดยจะมาแก้ปัญหาการแชร์ Data ระหว่าง Container ภายใน Pod
Note: emptyDir จัดการโดย kubelet
emptyDir can read and write the same files / mounted at the same or different paths in each container
- YAML
apiVersion: v1
kind: Pod
metadata:
  creationTimestamp: null
  labels:
    run: mcss
  name: mcss
spec:
  containers:
  - image: nginx
    name: mcss
    resources: {}
    volumeMounts:
    - mountPath: /tmp/cache
      name: cache-volume
  - image: pingkunga/service-test
    name: c2
    volumeMounts:
    - mountPath: /tmp/cache
      name: cache-volume
  dnsPolicy: ClusterFirst
  restartPolicy: Always
  volumes:
  - name: cache-volume
    emptyDir:
      sizeLimit: 500Mi
- Sample Use-Case
- scratch space เป็นพื้นที่ทด เช่น
>> merge sort Json เยอะๆ
>> พักงานที่ consume จาก queue เข้ามาก่อนประมวลผลต่อ
- checkpointing กรณีที่เรามีงานขนาดใหญ่ และ compute intensive (ใช้ CPU) เยอะ ถ้าพังระหว่างทางเสียเวลา Process ใหม่อีก เลยเอาตัว emptyDir มาเป็นกระดาษทด ทำไปแล้วเท่าไหร่ ในกรณีที่ pod มันค้าง แล้วตายไป อีก pod ที่จับอยู่ จะได้เอางานมาทำต่อจากจุดล่าสุด ไม่ต้อง process ใหม่ทั้งหมด แต่ตัว app ต้องปรับด้วยนะ
- local content cache - cache แบบ ถ้าในพวก WordPress ทำแบบ WP Super Cache ทำ เอามาเป็นพวก Static HTML แต่ที่จะไป Render PHP ใหม่ทุกรอบ
พอเห็น Sample Use-Case เข้าใจเลยว่าทำไมใช้ memory
 volumes:
  - name: cache-volume
    emptyDir:
      sizeLimit: 500Mi
      medium: Memory
- downwardAPI
เอาข้อมูล Pod Information มาใช้งาน เช่น เอามาลง Log หรือ เขียนเป็น File
- Key Config
metadata:
  creationTimestamp: null
  #0. Initial Metadata พวก labels / annotations / namespace
  labels:
    run: nginx
    release: stable
    environment: dev
    tier: frontend
...
   downwardAPI:
      items:
      - path: "namespace.txt"                  #1-2 อ่านมาแล้ว Save เป็นไฟล์ชื่อ namespace.txt
        fieldRef:
         fieldPath: metadata.labels            #1-1 อ่านจากอะไร อันนี้จะมีใน doc จะอ่านทั้งหมด
      - path: "appinfo/release"                #2-2 อ่านมาแล้ว Save ไฟล์ชื่อ release อยู่ appinfo
        fieldRef:
         fieldPath: metadata.labels['release'] #2-1.อ่านเฉพาะ Label ชื่อ release
- Sample Use-Case
- ข้อมูล Pod Information จะได้ไม่ต้องตัดจากตัว kubectl get pod -o your prooerty
- Expose Pod Information to Containers Through Files | Kubernetes - YAML
apiVersion: v1
kind: Pod
metadata:
  creationTimestamp: null
  labels:
    run: nginx
    release: stable
    environment: prod
    tier: backend
    app.kubernetes.io/name: "inv-app"
    app.kubernetes.io/version: "8.8.12.0"
  annotations:
    apf.kubernetes.io/autoupdate-spec: "true"
    applyset.kubernetes.io/additional-namespaces: "inv-app,reg-app"
    applyset.kubernetes.io/tooling: "kubectl/v1.28"
  name: nginxping
  namespace: appbackend
spec:
  containers:
  - image: nginx
    name: nginx
    resources: {}
    volumeMounts:
    - name: podinfo
      mountPath: /opt/app/labels
  dnsPolicy: ClusterFirst
  restartPolicy: Always
  volumes:
  - name: podinfo
    downwardAPI:
      items:
      - path: "release"
        fieldRef:
         fieldPath: metadata.labels['release']
      - path: "environment"
        fieldRef:
         fieldPath: metadata.labels['environment']
      - path: "tier"
        fieldRef:
         fieldPath: metadata.labels['tier']
      - path: "app.kubernetes.io/name"
        fieldRef:
         fieldPath: metadata.labels['app.kubernetes.io/name']
      - path: "app.kubernetes.io/version"
        fieldRef:
         fieldPath: metadata.labels['app.kubernetes.io/version']
      - path: "apf.kubernetes.io/autoupdate-spec"
        fieldRef:
         fieldPath: metadata.annotations['apf.kubernetes.io/autoupdate-spec']
      - path: "applyset.kubernetes.io/additional-namespaces"
        fieldRef:
         fieldPath: metadata.annotations['applyset.kubernetes.io/additional-namespaces']
      - path: "namespace"
        fieldRef:
         fieldPath: metadata.namespace
status: {}
Ref: Downward API | Kubernetes
Ephemeral Volumes
Volume ที่ใช้เก็บข้อมูลชั่วคราว แก้เรื่อง Data หาย หรือ ทำ Cache (จริงๆมองอีก View ของการแบ่ง Volume)
- emptyDir: empty at Pod startup,
- configMap, downwardAPI, secret: inject different kinds of Kubernetes data into a Pod
- CSI ephemeral volumes: เป็น Volume ค่ายๆอื่นๆ ของที่พัฒนาตามมาตรฐาน CSI เช่น พวก Volume ของ Cloud ค่ายต่างๆ
- generic ephemeral volumes พวก PV/ PVC
Persistent Volume Family

- Storage Class (Class)
เอาไว้ทำ disk profile ก่อนนำมาใช้งานใน PV / PVC อาทิ เช่น SPEED (MEM / SSD / HDD / NETWORK) หรือ พวก Backup Policy เป็นต้น
- Key Property
- provisioner บอกว่าจะใช้ของค่ายไหน
Internal ของ K8S มีมาให้เองจะขึ้นต้นด้วย kubernetes.io เช่น Local (no-provisioner)
External ของ Cloud หรือ On-Premise ค่ายๆ อื่นๆ เช่น rancher.io/local-path
Note: หลัง K8S 1.28 Storage ของ Cloud จากเดิมที่ Internal จะแยกเป็น External คุยผ่าน CSI Driver
- parameters ล้อตาม provisioner ที่เลือก
- reclaimPolicy retain(เก็บไว้) vs delete
- allowVolumeExpansion - dynamically provisioned มีผลกับพวก pv / pvc ที่ on top อีกที
- mountOptions
- volumeBindingMode unset, Immediate, WaitForFirstConsumer (ที่เห็นใน Lab อันนี้) - Sample YAML
apiVersion: storage.k8s.io/v1
kind: StorageClass
metadata:
  name: local-storage
provisioner: kubernetes.io/no-provisioner
volumeBindingMode: WaitForFirstConsumer
- List Storage Class ใช้กรณีทีเราไม่ได้ลง K8S เอง จะได้มา List Storage Class ที่มี Profile ไว้ สำหรับตอนสร้าง PV / PVC ต่อไป
kubectl get StorageClass

#Sample Result
NAME                   PROVISIONER             RECLAIMPOLICY   VOLUMEBINDINGMODE      ALLOWVOLUMEEXPANSION   AGE
local-path (default)   rancher.io/local-path   Delete          WaitForFirstConsumer   false                  16d
Ref: Storage Classes | Kubernetes
- Persistent Volume (PV)
Persistent Volume เป็นการจองพื้นที่ตาม Profile ที่กำหนดไว้ใน Storage Class
- Key Config
- capacity > storage บอกขนาดของ Disk ที่จองหน่วย Gi
- volumeMode
>> FileSystem - พวก Folder ที่เราคุ้นเคย
>> Blob - เห็นเนื่อที่เท่าๆกัน ถ้าดูจะได้ Binary
- storageClassName - บอก Profile ของ Disk
NOTE: สังเกตุ YAML อันถัดไปมันจะมี HostPath ด้วย ใน doc k8s for test
Ref: Configure a Pod to Use a PersistentVolume for Storage | Kubernetes
- accessModes
- persistentVolumeReclaimPolicy
>> Delete - Pod ตายลบเลย
>> Retain - เก็บไว้ แต่ต้องใช้สร้างใหม่ต้องเอา Volume ใหม่มาจับ
>> Recycle - เอาออกในอนาคต แทนด้วย Dynamic Provisioner
accessModes
>> ReadWriteOnce - อ่าน + เขียน จาก Node เดียว
>> ReadOnlyMany - อ่านจากหลายๆ Node ได้
>> ReadWriteMany - อ่าน + เขียน จากหลายๆ Node ได้
>> ReadWriteOncePod - ensuring that only one pod can write to the volume at a time
Ref: Kubernetes 1.27: Single Pod Access Mode for PersistentVolumes Graduates to Beta | Kubernetes - Sample YAML
apiVersion: v1
kind: PersistentVolume
metadata:
  name: ds-pv
spec:
  capacity:
    storage: 1Gi
  volumeMode: Filesystem
  accessModes:
    - ReadWriteOnce
  #hostPath for test
  hostPath:
    path: /tmp
  storageClassName: local-path
  persistentVolumeReclaimPolicy: Recycle
- Persistent Volume Claim (PVC)
Persistent Volume Claim (PVC) - เป็นยึดพื้นที่ (Claim) จาก PV เพื่อใช้งาน (a request for storage by a user)
- Key Config
- resources - บอกพื้นที่ที่จะใช้ resources.requests.storage
- selector - เลือก Claims จากการระบุตรงๆ หรือ expression (ตาม Selector)
> volumeName = มาจาก PV / Volume ตามชื่อตรงๆ
> selector จับตามเงื่อนไขจาก matchLabels / matchExpressions
Note: selector ตรงนี้อาจจะเขียนจับตาม Region / Zone จะได้ใน Data ใน Cloud เดียวกัน ใน DC เดียวกัน
- Sample YAML ตอนสร้างเสร็จ ต้องได้สถานะ Bind
apiVersion: v1
kind: PersistentVolumeClaim
metadata:
  name: ds-pvc
spec:
  accessModes:
    - ReadWriteOnce
  volumeMode: Filesystem
  resources:
    requests:
      storage: 512Mi
  storageClassName: local-path
  volumeName: ds-pv
  #selector:
  #  matchLabels:
  #    release: "customer"
  #  matchExpressions:
  #  - {key: environment, operator: In, values: [dev]}
- ตอนเอาไปใช้งานเอา PVC ที่เตรียมไว้ใน มาอ้างอิง Volume ของ Pod (persistentVolumeClaim.claimName)
apiVersion: v1
kind: Pod
metadata:
  name: task-pv-pod
spec:
  containers:
    - name: task-pv-container
      image: nginx
      ports:
        - containerPort: 80
          name: "http-server"
      volumeMounts:
        - mountPath: "/usr/share/nginx/html"
          name: ds-pvc-storage
  volumes:
    - name: ds-pvc-storage
      persistentVolumeClaim:
        claimName: ds-pvc
พวกลำดับของ SC > PV > PVC เหมือนจะข้ามได้จาก SC > PVC เลย
Ref: kubernetes - Can we get Persistent Volume with only PVC (without PV) in k8s? - Stack Overflow
Lifecycle of a volume and claim
เด่น Provisioning / Binding / Using / Reclaiming
Ref: Persistent Volumes | Kubernetes
Inject Data Into App
Command and Arguments - การกำหนดคำสั่งจากตัว declarative file เพื่อมา override Command ของ container image ที่มีให้ ใน dockerfile ก็คือ ตัว EntryPoint
apiVersion: v1
kind: Pod
metadata:
  name: command-demo
  labels:
    purpose: demonstrate-command
spec:
  containers:
  - name: command-demo-container
    image: debian
    command: ["printenv"]                   #Overide container image  ด้วยคำสั่ง printenv
    args: ["HOSTNAME", "KUBERNETES_PORT"]   #ส่ง Param ที่ printenv ต้องการ
  restartPolicy: OnFailure
Environment Variables - Inject ตัวแปร Environment Variables เข้าไปใน Container โดยมี 2 รูปแบบ
- env ประกาศใน Declarative File
apiVersion: v1
kind: Pod
metadata:
  name: envar-demo
  labels:
    purpose: demonstrate-envars
spec:
  containers:
  - name: envar-demo-container
    image: gcr.io/google-samples/node-hello:1.0
    env:
    - name: DEMO_GREETING
      value: "Hello from the environment"
    - name: DEMO_FAREWELL
      value: "Such a sweet sorrow"
#ตอนตรวจก็
- envFrom ดึงจาก ConfigMap จำได้แม่น 55 คนอื่น Mount เข้ามาเราโยนมาใส่ แล้วเขียนไฟล์ใหม่ 555
use-case
apiVersion: v1
kind: Pod
metadata:
  name: dependent-envars-demo
spec:
  containers:
    - name: dependent-envars-demo
      args:
        - while true; do echo -en '\n'; printf UNCHANGED_REFERENCE=$UNCHANGED_REFERENCE'\n'; printf SERVICE_ADDRESS=$SERVICE_ADDRESS'\n';printf ESCAPED_REFERENCE=$ESCAPED_REFERENCE'\n'; sleep 30; done;
      command:
        - sh
        - -c
      image: busybox:1.28
      env:
        - name: SERVICE_PORT
          value: "80"
        - name: SERVICE_IP
          value: "172.17.0.1"
        - name: UNCHANGED_REFERENCE
          value: "$(PROTOCOL)://$(SERVICE_IP):$(SERVICE_PORT)"
        - name: PROTOCOL
          value: "https"
        - name: SERVICE_ADDRESS
          value: "$(PROTOCOL)://$(SERVICE_IP):$(SERVICE_PORT)"
        - name: ESCAPED_REFERENCE
          value: "$$(PROTOCOL)://$(SERVICE_IP):$(SERVICE_PORT)"
UNCHANGED_REFERENCE=$(PROTOCOL)://172.17.0.1:80
SERVICE_ADDRESS=https://172.17.0.1:80
ESCAPED_REFERENCE=$(PROTOCOL)://172.17.0.1:80
- Pod fields as values คล้ายๆกับ downwardapi
apiVersion: v1
kind: Pod
metadata:
  name: dapi-envars-fieldref
spec:
  containers:
    - name: test-container
      image: registry.k8s.io/busybox
      command: [ "sh", "-c"]
      args:
      - while true; do
          echo -en '\n';
          printenv MY_NODE_NAME MY_POD_NAME;
          printenv MY_POD_IP;
          sleep 10;
        done;
      env:
        - name: MY_NODE_NAME
          valueFrom:
            fieldRef:
              fieldPath: spec.nodeName
        - name: MY_POD_NAME
          valueFrom:
            fieldRef:
              fieldPath: metadata.name
        - name: MY_POD_IP
          valueFrom:
            fieldRef:
              fieldPath: status.podIP
  restartPolicy: Never
ConfigMap
เก็บ Config ที่ใช้งานบ่อยๆ หรือใช้กันหลายที่ จะได้จัดการจากจุดเดียว แต่ขนาดต้องไม่เกิน 1MB อยู่ในรูปแบบ key & value
- Command
kubectl create configmap config --from-literal=db_user=admin --from-literal=db_password=test

#Get the config map as yaml file and try to understand
kubectl get configmap config -o yaml

#from the file
kubectl create configmap configenv --from-env-file=config.env

kubectl create configmap configfile --from-file=config.txt

—from-file คือใส่ได้ทั้ง file ที่นามสกุลอื่นๆ ได้เลย แต่ถ้าเป็น -env ใส่ .env เข้าไป มันจะ convert เป้น env ใน configmap ให้เลย
- Declarative File
apiVersion: v1
kind: ConfigMap
metadata:
  name: invconfigmap
  namespace: default
data:
  config_dev.json: |
    {
        "current_env" : "dev",
        "Directory_Type" : "folder",
        "report_location": "reports"
    }
  config_prod.json: |
    {
      "current_env" : "prod",
      "Directory_Type" : "folder",
      "report_location": "reports"
    }
Sample Use-Case
- ENV - Override Env ใช้กรณีที่ Key เปลี่ยน กรณีนี้ Image แก้จาก ASPNETCORE_ENVIRONMENT >> ASPNETCORE_ENV ถ้าแก้จาก ConfigMap Container ที่ Run Image Version ก่อน อาจจะตุยได้
...
  env:
  - name: ASPNETCORE_ENV
    valueFrom:
      configMapKeyRef:
        name: options                  #ชิ้่อ Config Map
        key: ASPNETCORE_ENVIRONMENT    #key ใน Config Map
- ENV:KeyRef - Initial Env จาก Config Map ทับทั้งชุด
kubectl create configmap config --from-literal=db_user=admin --from-literal=db_password=test

#Get the config map as yaml file and try to understand
kubectl get configmap config -o yaml
apiVersion: v1
kind: Pod
metadata:
  creationTimestamp: null
  labels:
    run: nginx2
  name: nginx2
spec:
  containers:
  - image: nginx
    name: nginx2
    resources: {}
    envFrom:
    - configMapRef:
        name: config
  dnsPolicy: ClusterFirst
  restartPolicy: Always
status: {}
- Volume - All Key as File > Mount เข้าไป
apiVersion: apps/v1
kind: Deployment
metadata:
  name: invapp
spec:
  replicas: 1
  selector:
    matchLabels:
      app: invapp
  template:
    metadata:
      labels:
        app: invapp
    spec:
      containers:
        - name: invapp
          image: invapp:latest
          volumeMounts:
          - mountPath: /etc/config
            name: json-configmap-volume
          resources:
            requests:
              cpu: 100m
              memory: 1Gi
      #Mount configmap เข้าไป
      volumes:
        - name: json-configmap-volume
          configMap:
            name: invconfigmap      #<-- ต้องประกาศไว้ก่อน ถ้าใน Blog ตัวอย่างอยู่ใน Declarative File
Note ถ้ามัน pending นานให้ describe ดูได้ อาจจะติดเช่น หา ConfigMap ไม่เจอ
Secret
มัน คือ ConfigMap ที่ใช้เก็บข้อมูลสำคัญ โดยจะ Encrypt อยู่ในรูปแบบ Base64 แต่บน K8S มี Guideline ใช้ Secret ดังนี้
- Encrypt At Rest (ปล ข้อมูลใน ETCD ไม่ Encrypt)
- RBAC + least privilege
- Restrict Container Access เช่น การป้องกัน Shell / Distroless Image
- ใช้ External Service Provide เช่น Azure KeyVault / HashiCorp Vault
ตัว Secret พอเข้า env ของ app ไปเดี๋ยวมัน decrypt ออกให้
- Command
kubectl create secret generic pingsecret --from-literal=db_user=admin --from-literal=db_password=test -n group-1

#Get the secret as yaml file and try to understand
kubectl get secrets pingsecret -o yaml -n group-1
- Declarative File
apiVersion: v1
kind: Secret
metadata:
  name: my-secret
type: Opaque
data:
  username: YWRtaW4=
  password: MWYyZDFlMmU2N2Rm
Sample Use-Case - เปลี่ยนจาก configMapRef > secretKeyRef
- ENV - Override Env
apiVersion: v1
kind: Pod
metadata:
  name: env-single-secret
spec:
  containers:
  - name: envars-test-container
    image: nginx
    env:
    - name: SECRET_USERNAME       #APP ใช้
      valueFrom:
        secretKeyRef:
          name: backend-user      #ชื่อ Config
          key: backend-username   #ชื่อ key
- ENV:KeyRef - Initial Env จาก Secret Map ทับทั้งชุด
apiVersion: apps/v1
kind: Deployment
metadata:
  name: invapp
  labels:
    app: invapp
spec:
  replicas: 1
  selector:
    matchLabels:
      app: invapp
  template:
    metadata:
      labels:
        app: invapp
    spec:
      containers:
        - name: app
          image: invapp:lastest
          imagePullPolicy: Always
          ports:
            - containerPort: 80
          envFrom:
          - configMapRef:
              name: env-configmap
          - secretRef:
              name: my-secret
- Volume - All Key as File > Mount เข้าไป
apiVersion: v1
kind: Pod
metadata:
 name: secret-test-pod
spec:
 containers:
 - name: test-container
   image: nginx
   volumeMounts:
    - name: secret-volume
      mountPath: /etc/secret-volume
      readOnly: true
 volumes:
 - name: secret-volume
   secret:
   secretName: my-secret
Note: ใน yaml - คือ List มีลำดับ
Q: ถ้า configmap / secret เปลี่ยน ให้ restart เพื่อ load ค่าใหม่
A: witness controller ปรับ App Live reload configuration
สรุปก่อน
การเก็บข้อมูลใน K8S จะแบ่งกลุ่มได้ ดังนี้
Storage Data ที่เรียนมา
- Volume
-> hostPath - แปะลง node path ระวังเรื่อง pod ตายวิญญาณอาจจะเข้าผิดร่าง
-> emptyDir - ตายไปของหลาย ทำงานชั่วคราว
-> downwardAPI - ดึงข้อมูลของ Pod
-> Persistent Volume - เก็บถาวร  PVC / PV / Storage Class
-> อื่่นๆ
- Inject Data to App: Env + Command & Args
- ConfigMap
- Secret
วันเสาร์มีมาทำ LAB ตอนเช้าพอทำได้ ตอนบ่ายทำได้แหละ แต่ท่าไม่เหมือนชาวบ้าน คนอื่น mount secret / configmap เป็น volume ผม inject เข้า app แล้ว print ออกมา 555
Reference
Discover more from naiwaen@DebuggingSoft
Subscribe to get the latest posts sent to your email.