Table of Contents
Implement Azure Key Vault
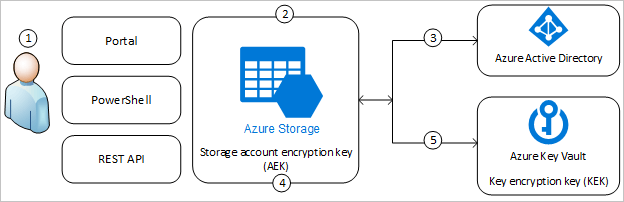
- Explore Azure Key Vault - เป็น Tools ที่รองรับการจัดการข้อมูลลับที่สำคัญ โดยรองรับทั้งส่วนของ SW และ HW - hardware security module(HSM) หน้าที่ของ Key Vault มี ดังนี้
- Secrets Management - พวก tokens, passwords, API Key
- Key Management - พวก encryption keys
- Certificate Management - public and private SSL/TLS certificates
- Key benefits of using Azure Key Vault
- Centralized application secrets
- Securely store secrets and keys - ผ่าน Azure AD และ Azure RBAC รวมถึงมี HSM ในแบบ Premium
- Monitor access and use - ตัว Azure Key Vault มีส่วน Access อยู่แล้ว ถ้าจะเอาไปใช้งานอาจจะทำ
- เอา Log เก็บใน Storage หรือ ส่งให้ Event Hub
- Send the logs to Log Analytics
- Simplified administration of application secrets - Scaling / Replicating / Automating (eg. certificates enrollment and renewal.) / ลด Learning Curve/Effort ของ Admin
- Integrate with other Azure services
- Discover Azure Key Vault best practices
- Authentication
- Managed identities for Azure resources - Azure จัดการให้ ทั้งเรื่อง Key และการ Rotate (best practice)
- Service principal and certificate - ต้อง Rotate Key/Secret เอง
- Service principal and secret - ทำเองหมด
- Encryption of data in transit - Transport Layer Security (TLS) + RSA-based 2,048-bit. This combination makes it difficult for someone to intercept and access data that is in transit.
- Azure Key Vault best practices
- Use separate key vaults - แยก Dev / Test / Production ไม่ใช่ Key ร่วมระหว่างหลายระบบ
- Control access to your vault
- Backup
- Logging - สำหรับ Audit และอย่าลืมตั้งการแจ้งเตือนด้วย
- Recovery options: Turn on soft-delete and purge protection (น่าจะคล้ายกับ Recycle Bin)
- Authentication
- Authenticate to Azure Key Vault - มี 2 วิธี
- [Recommend] Enable a system-assigned managed identity for the application
- register the application with your Azure AD tenant - มันจะสร้าง second application object มาจัดการแทนใน tenant
- Authentication to Key Vault in application code
- ใข้ Azure Identity SDK เข้ามาจัดการ มี .NET / JAVA / Python / JS
- REST API Access tokens (Authorization: Bearer) ถ้ามีปัญหาแจ้งใน WWW-Authenticate header
PUT /keys/MYKEY?api-version= HTTP/1.1
Authorization: Bearer - Resource Azure Key Vault developer's guide | Microsoft Docs
- Set and retrieve a secret from Azure Key Vault by using Azure CLI
myKeyVault=az204vault-$RANDOM
myLocation=southeastasia

#สร้าง Resoucee Group
az group create --name az204-vault-rg --location $myLocation

#ขั้นตอนนี้จะนานหน่อย ถ้ามีไม่ Microsoft.KeyValut มันจะสร้างให้เลย
az keyvault create --name $myKeyVault --resource-group az204-vault-rg --location $myLocation

#ลองยัด Secret
az keyvault secret set --vault-name $myKeyVault --name "ExamplePassword" --value "hVFkk965BuUv"
#ลองให้แสดง
az keyvault secret show --name "ExamplePassword" --vault-name $myKeyVault
- หลัง
az keyvault secret showมันแสดง response ในแบบ json บอกข้อมูล Key Vault ที่สร้างเลย
{
  "attributes": {
    "created": "2022-02-19T03:39:27+00:00",
    "enabled": true,
    "expires": null,
    "notBefore": null,
    "recoveryLevel": "Recoverable+Purgeable",
    "updated": "2022-02-19T03:39:27+00:00"
  },
  "contentType": null,
  "id": "https://az204vault-20538.vault.azure.net/secrets/ExamplePassword/389a316e7e104967bb3d841830f4fe29",
  "kid": null,
  "managed": null,
  "name": "ExamplePassword",
  "tags": {
    "file-encoding": "utf-8"
  },
  "value": "hVFkk965BuUv"
}
Knowledge check - Implement Azure Key Vault(Knowledge check)
Implement managed identities
- Managed identities เป็นตัวที่ช่วยระบุตัวตน (Identity) สำหรับเข้าถึง Resource ต่างๆใน Azure เช่น เข้า Azure VM / Azure Key Vault โดย Managed identities มี 2 แบบ
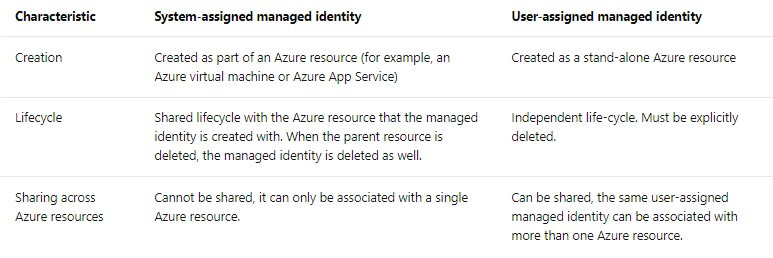
- A system-assigned managed identity
- A user-assigned managed identity
- NOTE ถ้า Managed identity ถูกลบ service principal จะถูกเอาออกไปด้วย
- Characteristics of managed identities
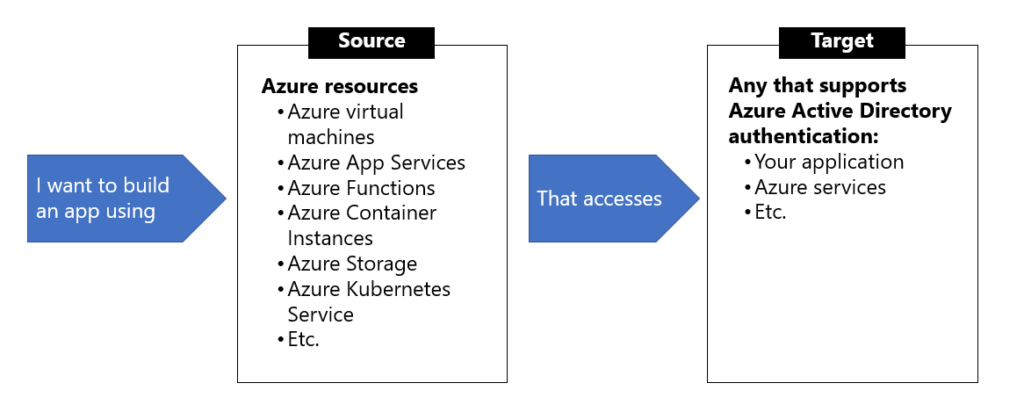
- When to use managed identities
Example you want to build an app using Azure App Services that accesses Azure Storage without having to manage any credentials.
- Discover the managed identities authentication flow - เหมือนขยายความจาก Characteristics of managed identities Flow มันจะคล้ายๆกัน แต่ต่างกันตรง Life Cycle และการนำไปใช้ต่อ
- system-assigned ผูกกับ Resource
- user-assigned แยกขาดกับ resource ใช้กับ resource อื่นๆได้ แต่ต้องจัดการเอง
- Configure managed identities
- system-assigned สร้างพร้อมกับ Resource
- user-assigned สร้าง Identity ก่อน แล้วถึงนำมาผูก
- NOTE นอกจาก CLI มี SDK เตรียมไว้ด้วย
##System-assigned managed
#Create
az vm create --resource-group myResourceGroup \
    --name myVM --image win2016datacenter \
    --generate-ssh-keys \
    --assign-identity \
    --admin-username azureuser \
    --admin-password myPassword12
#Existing
az vm identity assign -g myResourceGroup -n myVm

#############################################
##User-assigned managed
##Step 1 Create Idenitity ต่างกับ VM นะ
az identity create -g myResourceGroup -n myUserAssignedIdentity

##Step 2 Assign Identity
##Step 2.1 New
az vm create \
--resource-group <RESOURCE GROUP> \
--name <VM NAME> \
--image UbuntuLTS \
--admin-username <USER NAME> \
--admin-password <PASSWORD> \
--assign-identity <USER ASSIGNED IDENTITY NAME>   ##จาก Step 1
##Step 2.2 Existing
az vm identity assign \
    -g <RESOURCE GROUP> \
    -n <VM NAME> \
    --identities <USER ASSIGNED IDENTITY>			##จาก Step 1
- Acquire an access token (DEV NOTE)
- มี Manage Identity แล้ว ขา App ที่จะเอาไปใช้งาน จะต้องมาขอ Access Token ด้วย ในรูปแบบ JWT
- service principal - The token is based on the managed identities for Azure resources service principal.
- Code ใช้ REST / Code อันนี้ใช้ Lib ปกติเลย
using System;
using System.Collections.Generic;
using System.IO;
using System.Net;
using System.Web.Script.Serialization;

// Build request to acquire managed identities for Azure resources token
HttpWebRequest request = (HttpWebRequest)WebRequest.Create("http://169.254.169.254/metadata/identity/oauth2/token?api-version=2018-02-01&resource=https://management.azure.com/");
request.Headers["Metadata"] = "true";
request.Method = "GET";

try
{
    // Call /token endpoint
    HttpWebResponse response = (HttpWebResponse)request.GetResponse();

    // Pipe response Stream to a StreamReader, and extract access token
    StreamReader streamResponse = new StreamReader(response.GetResponseStream());
    string stringResponse = streamResponse.ReadToEnd();
    JavaScriptSerializer j = new JavaScriptSerializer();
    Dictionary<string, string> list = (Dictionary<string, string>) j.Deserialize(stringResponse, typeof(Dictionary<string, string>));
    string accessToken = list["access_token"];
}
catch (Exception e)
{
    string errorText = String.Format("{0} \n\n{1}", e.Message, e.InnerException != null ? e.InnerException.Message : "Acquire token failed");
}- Token caching - managed identities ไม่ทำ caching Dev ต้องทำเอง
- Flow การ Get Token กรณีที่มัน Expire
- Retry guidance - 404, 429, 5xx error code. App ควรมีการ retry ขอ token ไม่ อาจจะเกิดจากปัญหาใน Azure เองได้
Knowledge check - Implement managed identities (Knowledge check)
Implement Azure App Configuration
มี Manage Identity > ขอ Access Token เข้าใจ Azure Key Vault แล้ว รอบนี้มาลองปรับ App ตัว Code ให้รองรับด้วยครับ
- Azure App Configuration service
- App Configuration - ตัวชื่อที่ทำให้ App ของเราจัดด้าน Config / Feature / Security ได้ง่ายขึ้น
- App Configuration benefits
- A fully managed service that can be set up in minutes
- Flexible key representations and mappings
- Tagging with labels
- Point-in-time replay of settings
- Dedicated UI for feature flag management
- Comparison of two sets of configurations on custom-defined dimensions
- Enhanced security through Azure-managed identities
- Complete data encryptions, at rest or in transit
- Native integration with popular frameworks - .NET Core / .NET FRAMEWORK / SPRING (JAVA) / REST API เป็นต้น
- ส่วนประกอบของ App Configuration เป็น Key & Value
- Key - มี Pattern 2 แบบ flat / hierarchical (มีข้อดีจัดหมวดหมู่ได้) ตัว Key สามารถ Query ได้
- Version Key - ไม่มี แต่อาจจะ Apply เป็น Key ใหม่ และเอาเลข commit git มาใช้ได้
- Label Key - ใช้กับ key ที่ซ้ำกัน เอาไว้แยก Environment
#component
AppName:Service1:ApiEndpoint
AppName:Service2:ApiEndpoint

#region
AppName:Region1:DbEndpoint
AppName:Region2:DbEndpoint

#Label Key
Key = AppName:DbEndpoint & Label = Test
Key = AppName:DbEndpoint & Label = Staging
Key = AppName:DbEndpoint & Label = Production
- Value - UTF-8 String
- Manage application features
Feature Flag เอาไว้คุม Feature มีส่วนประกอบ 3 ส่วน
- Feature flag - Flag บอกเปิดปิด Feature
- Feature manager - จัดการ Feature และการทำ Caching
- Filter - Rule ตรวจสอบว่าควรจะเปิด ปิด Feature ตาม Condition ที่กำหนดไหม
- Secure app configuration data
- Customer-managed keys
- จาก Flow พบว่า wrapped encryption key is then stored and the unwrapped encryption key is cached within App Configuration for one hour. (พอครบแล้ว Refresh ใหม่
- Requirement ของการทำ
- Standard tier Azure App Configuration instance
- Azure Key Vault - soft-delete and purge-protection features enabled
- RSA or RSA-HSM key - Key ไม่ต้อง Expired ต้องทำ wrap and unwrap
- ตอนใช้งาน
- กำหนด managed identity ให้ Azure App Configuration
- Grant identity
GETWRAPUNWRAP
- Private endpoints
- Securely connect to the App Configuration store from on-premises networks
- Must separate private endpoint for each App Configuration store (Get Connection String App Configuration Settings > Access Keys.)
- Managed identities
- system-assigned identity - สร้างผูกกับ Resource
- user-assigned identity - สร้าง และดูแลเอง
Knowledge check - Implement Azure App Configuration (Knowledge check)
Reference
Discover more from naiwaen@DebuggingSoft
Subscribe to get the latest posts sent to your email.