Blog ตอนนี้ผมว่าคล้ายๆตอนใน AZ-900 พอสมควรเลยครับ (อ่าน Short Note ของ AZ-900 เพิ่มได้ครับ)
Table of Contents
Provision virtual machines in Azure
- Design considerations for virtual machine creation
- Availability
- VM size
- VM limits
- VM image
- VM disks มี 2 แบบ Standard disks / Premium disks (SSD), high-performance+ low-latency disk
- Managed disks: recommended disk storage model 4 terabytes (TB),
- Unmanaged disks จัดการ VHD ตาม storage accounts
- Virtual machine extensions
- Run custom scripts
- PowerShell Desired State Configuration (DSC) Extension - Deploy and manage configurations
- Collect diagnostics data
- NOTE: For Linux VMs, Azure supports cloud-init Automateion Tools like Ansible
- Compare virtual machine availability options
- Availability zones
- Zonal services
- Zone-redundant services
- Availability sets logical grouping of VMs that allows Azure to understand how your application is built to provide for redundancy and availability
- Fault domains - กลุ่มของ Resource ทีมีทำ availability set มันจะ Sync ข้อมูลให้
- Update domains - กลุ่มของ Resource ที่ทาง MS จัดการให้ตอน MA ถ้าแก้ แล้ว เดี๋ยว MS สลับให้
- Virtual machine scale sets - Scale response to demand or a defined schedule
- Load balancer - most application resiliency
- Availability zones
- Determine appropriate virtual machine size ใช้งานแบบไหน เลือก VM ให้เหมาะสม
- General Purpose - งานเล็กๆ หรือ สำหรับช่วง Develop
- Compute Optimized - High CPU-to-memory ratio application servers / web server
- Memory Optimized - relational database servers
- Storage Optimized - Big Data, SQL, NoSQL databases
- GPU - สำหรับทำ Machine Learning
- High Performance Compute - ดีทุกด้าน
- Create a virtual machine
az group create --name az204-vm-rg --location <myLocation>

az vm create \
    --resource-group az204-vm-rg \
    --name az204vm \
    --image UbuntuLTS \
    --generate-ssh-keys \
    --admin-username azureuser
- Knowledge check - Provision virtual machines in Azure(Knowledge check)
Create and deploy Azure Resource Manager templates
- Azure Resource Manager templates มีข้อดีอย่างไร
- Declarative syntax : เขียน Code ในรูปแบบ JSON (ตอนแรกคิดว่าเก็บ Key Value เฉยๆ มี Logic ด้วย
- Repeatable results ผลลัพธ์เหมือนเดิม
- Orchestration เอาไป Run ที่ไหนก็ได้
- ส่วนสำคัญใน ARM Template file
- Parameters - different environments. แยกไฟล์ก็ได้
- Variables
- User-defined functions
- Resources
- Outputs
- NOTE: apiVersion - กำหนดไว้ เพื่อให้ Azure เอาตัว Execute ไปสร้างตาม Template ได้ถูกต้อง ไม่เจอ Breaking Change
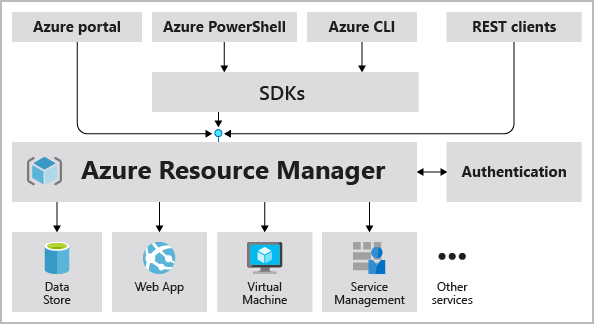
- Deploy Template Tools - มันเหมือนกัน AZ-900 เพิ่มขึ้นมา REST-API / Button in GitHub repository
Azure portal / Azure CLI / PowerShell / REST API / Button in GitHub repository / Azure Cloud Shell
- Defining multi-tiered templates
- Template ไม่จำเป็นต้องเจาะจงลงไปเฉพาะงาน อาจจะเตรียม Template กลางสำหรับ App / DB / VM แยกออกมา เพื่อให้ง่ายกับ Reuse
- Share templates Azure RBAC มันทำให้แยก Role ได้ ว่าคนสร้าง และ คนนำไปใช้
- Explore conditional deployment
- ใช้ Field newOrExisting + condition เพื่อตรวจสอบก่อนสร้าง Resource
- Runtime functions - เป็นไปได้ ถ้าใช้อะไรที่เป็น reference / กลุ่ม List เขียน IF ดักด้วย ตอนแรกงง IF อะไร แต่เจอและ ตามนี้ ARM Template (IF) | Microsoft Docs
- Set the correct deployment mode
- Validate mode - ตรวจว่า ARM Template มี Syntax Error ไหม ?
- Complete mode ลบสร้างใหม่
- Incremental mode เพิ่มเฉพาะ Resource ที่ยังไม่มี
- Sample Command ดูจาก mode
az deployment group create \
  --mode Complete \
  --name ExampleDeployment \
  --resource-group ExampleResourceGroup \
  --template-file storage.json
- Knowledge check - Create and deploy Azure Resource Manager templates(Knowledge check)
Manage container images in Azure Container Registry
- Azure Container Registry
- Basic
- Standard = Basic + เพิ่ม Storage
- Premium = Standard + Supported images and artifacts
- Container image - เป็น Image ที่ทำมาตามมาตรฐาน Open Container Initiative (OCI) เช่น Docker / Podman
- Automated image builds - Azure Container Registry Tasks (ACR Tasks) Tool นี้จรืงๆว่าไปเหมือนพวกคำสั่ง docker แก้เป็น ACR ยกตัวอย่าง เช่น
#Create a basic container registry.
az acr create --resource-group az204-acr-rg \
    --name <myContainerRegistry> --sku Basic

#Build image from docker file
az acr build --image sample/hello-world:v1  \
    --registry <myContainerRegistry> \
    --file Dockerfile .

#List Image in Repository
az acr repository list --name <myContainerRegistry> --output table
- Explore storage capabilities
- Encryption-at-rest - encrypts an image
- Regional storage
- Zone redundancy (Premium)
- Scalable storage
- Build and manage containers with tasks
- Quick task
- Automatically triggered tasks
- Trigger on source code update
- Trigger on base image update
- Trigger on a schedule
- Multi-step task -
- Explore elements of a Dockerfile
# Step 1: Specify the parent image for the new image
FROM ubuntu:18.04

# Step 2: Update OS packages and install additional software
RUN apt -y update &&  apt install -y wget nginx software-properties-common apt-transport-https \
	&& wget -q https://packages.microsoft.com/config/ubuntu/18.04/packages-microsoft-prod.deb -O packages-microsoft-prod.deb \
	&& dpkg -i packages-microsoft-prod.deb \
	&& add-apt-repository universe \
	&& apt -y update \
	&& apt install -y dotnet-sdk-3.0

# Step 3: Configure Nginx environment
CMD service nginx start

# Step 4: Configure Nginx environment
COPY ./default /etc/nginx/sites-available/default

# STEP 5: Configure work directory
WORKDIR /app

# STEP 6: Copy website code to container
COPY ./website/. .

# STEP 7: Configure network requirements
EXPOSE 80:8080

# STEP 8: Define the entry point of the process that runs in the container
ENTRYPOINT ["dotnet", "website.dll"]
- Knowledge check - Manage container images in Azure Container Registry(Knowledge check)
Run container images in Azure Container Instances
- Explore Azure Container Instances
- ACI benefits
- Fast startup
- Container access IP address and a fully qualified domain name (FQDN)
- Hypervisor-level security
- stores minimum Customer data
- Custom sizes
- Persistent storage Mount Azure Files
- Linux and Windows - Same API
- Container groups
- Container groups = pod in Kubernetes
- Multi-container groups currently support only Linux containers
- Deployment - ARM Template / YAML (แนะนำ YAML format's more concise nature)
- Resource allocation ตาม container เลย ถ้าแต่ละอันใช่ 1 CPU มี 3 ตัวจะกินไป 3 CPU
- Networking
- Container groups share an IP address and a port namespace on that IP address
- port mapping isn't supported
- Storage
- Azure file share
- Secret
- Empty directory
- Cloned git repo
- ตัวอย่างคำสั่งที่ใช้สร้าง หัวข้อก่อนจะเป็น registry
az container create --resource-group az204-aci-rg
    --name mycontainer
    --image mcr.microsoft.com/azuredocs/aci-helloworld
    --ports 80
    --dns-name-label $DNS_NAME_LABEL --location <myLocation>
- Container restart policy
- Restart policy
- Always
- Never
- OnFailure
- Specify a restart policy (--restart-policy)
az container create \
--resource-group myResourceGroup \
--name mycontainer \
--image mycontainerimage \
--restart-policy OnFailure
- ถ้า Container Stop โดยที่กำหนด Restart policy เป็น Never / OnFailure ระบบแสดงเป็น Terminated
- Set Container environment variables
- docker ใช้ -env ตอน create / run
- ACI ใช้ --environment-variables ตัวอย่าง เช่น
az container create
    --resource-group myResourceGroup
    --name mycontainer2
    --image mcr.microsoft.com/azuredocs/aci-wordcount:latest
    --restart-policy OnFailure
    --environment-variables 'NumWords'='5' 'MinLength'='8'
- Secure values เอาไว้เก็บข้อมูลสำคัญปกติจะไม่ใส่ใน Command แต่เก็บใน YAML แทน
apiVersion: 2018-10-01
location: eastus
name: securetest
properties:
  containers:
  - name: mycontainer
    properties:
      environmentVariables:
        - name: 'NOTSECRET'
          value: 'my-exposed-value'
        - name: 'SECRET'
          secureValue: 'my-secret-value'  <<< เพิ่มตรงนี้
      image: nginx
      ports: []
      resources:
        requests:
          cpu: 1.0
          memoryInGB: 1.5
  osType: Linux
  restartPolicy: Always
tags: null
type: Microsoft.ContainerInstance/containerGroups
- ตอน Run เอา YAML ยัดลงไปด้วย
az container create --resource-group myResourceGroup
    --file secure-env.yaml
- Mount an Azure file share in Azure Container Instances
- Limitation - Linux containers can mount only Azure Files shares (As root) / limited to CIFS support
- Deploy container and mount volume (AZ Create) ใช้ param
--azure-file-volume-[Key]
az container create \
    --resource-group $ACI_PERS_RESOURCE_GROUP \
    --name hellofiles \
    --image mcr.microsoft.com/azuredocs/aci-hellofiles \
    --dns-name-label aci-demo \
    --ports 80 \
    --azure-file-volume-account-name $ACI_PERS_STORAGE_ACCOUNT_NAME \
    --azure-file-volume-account-key $STORAGE_KEY \
    --azure-file-volume-share-name $ACI_PERS_SHARE_NAME \
    --azure-file-volume-mount-path /aci/logs/
- Deploy container and mount volume (YAML)
apiVersion: '2019-12-01'
location: eastus
name: file-share-demo
properties:
  containers:
  - name: hellofiles
    properties:
      environmentVariables: []
      image: mcr.microsoft.com/azuredocs/aci-hellofiles
      ports:
      - port: 80
      resources:
        requests:
          cpu: 1.0
          memoryInGB: 1.5
      volumeMounts:
      - mountPath: /aci/logs/
        name: filesharevolume      <<-- Mount filesharevolume
  osType: Linux
  restartPolicy: Always
  ipAddress:
    type: Public
    ports:
      - port: 80
    dnsNameLabel: aci-demo
  volumes:
  - name: filesharevolume          <<-- filesharevolume property สำหรับที่ต่อ Azure File Share
    azureFile:
      sharename: acishare
      storageAccountName: <Storage account name>
      storageAccountKey: <Storage account key>
tags: {}
type: Microsoft.ContainerInstance/containerGroups
- Mount multiple volumes ทำได้ทั้งแบบ ARM Template และ YAML กรณีของ YAML ให้ทำเป็น JSON Array ตามตัวอย่าง
#DECLARE VOLUME
"volumes": [{
  "name": "myvolume1",
  "azureFile": {
    "shareName": "share1",
    "storageAccountName": "myStorageAccount",
    "storageAccountKey": "<storage-account-key>"
  }
},
{
  "name": "myvolume2",
  "azureFile": {
    "shareName": "share2",
    "storageAccountName": "myStorageAccount",
    "storageAccountKey": "<storage-account-key>"
  }
}]

#MOUNT VOLUME
"volumeMounts": [{
  "name": "myvolume1",
  "mountPath": "/mnt/share1/"
},
{
  "name": "myvolume2",
  "mountPath": "/mnt/share2/"
}]
- Knowledge check - Run container images in Azure Container Instances (Knowledge check)
Reference
Discover more from naiwaen@DebuggingSoft
Subscribe to get the latest posts sent to your email.