หลังจาก Blog ตอนที่แล้ว ผมได้เขียนเกี่ยวกับเขียน Spring โดยใช้ VSCode ครับ ซึ่งจาก Blog ตอนก่อน ยังติดปัญหาอยู่ที่ว่าเว็บทำงานแล้ว แต่ไม่มีการแสดงผลอะไรทั้งนั้นเลย ซึ่งใน Blog ตอนนี้ผมจะมาทำ Hello world ครับ
สิ่งที่ต้องเตรียม
- งานที่ทำจาก Blog ตอนก่อนหน้าครับ
- ถ้าไม่ได้เริ่มมาจาก Blog ผม ก็สามารถเพิ่ม Dependency ไปที่ไฟล์ pom.xml ดังนี้
<dependency>
   <groupId>org.springframework.boot</groupId>
   <artifactId>spring-boot-starter-test</artifactId>
   <scope>test</scope>
</dependency>
ลุยยเลยครับ
📌 มาดูโครงสร้างของ Project กันก่อนครับ
src
-> main
   -> java (ภาษาที่ใช้)
      -> com (Package#01)
	  -> cu (Package#02)
             -> thesis (Package#03)
                    -> WeMuBPMN (Project)
                       -> hello
                          HelloController.java (กำลังเพิ่ม)
   -> resource
      -> static << เอาไว้เก็บพวก CSS / Java
      -> templates
      application.properties << ไฟล์นั้สำคัญนะ เดี๋ยว Config บางเรื่อง เช่น Database จะถูกเก็บไว้ที่นี่
-> test
   -> java (ภาษาที่ใช้)
      -> com (Package#01)
	  -> cu (Package#02)
             -> thesis (Package#03)
	        -> WeMuBPMN (Project)
                   -> hello
                      HelloControllerTest.java (กำลังเพิ่ม)
pom.xml << จัดการกับ Dependency ทั้งหลาย- สิ่งที่ผมเพิ่มเข้าไป คือ โพลเดอร์ hello ทั้งใน main และส่วนของ test ครับ
- เพิ่มไฟล์ HelloController.java เข้าไปที่ Path /j่ava/main/com/cu/thesis/WeMuBPMN/hello/ ครับ
- เริ่ม Code กันเลยครับ โดยผมต้องการว่า ถ้ามี Request เข้ามาที่ url http://localhost:8080/hello ให้ระบบแสดงคำว่า
สวัสดีชาวโลก
📌 มาดูที่ Code กันครับ ซึ่งมีสิ่งที่ต้องสนใจ ดังนี้
package com.cu.thesis.WeMuBPMN.hello;

import org.springframework.web.bind.annotation.RequestMapping;
import org.springframework.web.bind.annotation.RestController;

@RestController
public class helloController{
    @RequestMapping("/hello")
    public String index() {
        return "สวัสดีชาวโลก";
    }

}
@RestController เป็นสิ่งที่ทำใหเ ClasshelloController เป็น WebService แล้วครับ
จากนั้นลองมาดูที่ Method Index ครับ สิ่งที่ผมทำ คือ ถ้ามี Request /hello มา ตัว @RequestMapping จะดักไว้ครับ เอาง่ายๆ ถ้ามีอะไร /hello เข้ามา Method Index ทำงานครับ
- มาทดสอบผ่านหน้าเว็บกันครับ

- บอกไปว่ามันเป็น WebService งั้นลองผ่าน Postman กันดีกว่า

📌 และสุดท้าย ถ้าต้องการให้มันดูมีมูลค่า เรามาทำ Unit Test กันครับ
- สร้างไฟล์ HelloControllerTest.java ตาม Path /j่ava/main/com/cu/thesis/WeMuBPMN/hello/ เลยครับ
- จากนั้นเขียน Code ตามนี้เลยครับ โดยใช้ SpingMVCTest สำหรับช่วย Test ครับ
package com.cu.thesis.WeMuBPMN.hello;

import org.junit.Test;
import org.junit.runner.RunWith;
import org.springframework.beans.factory.annotation.Autowired;
import org.springframework.boot.test.autoconfigure.web.servlet.AutoConfigureMockMvc;
import org.springframework.boot.test.context.SpringBootTest;
import org.springframework.http.MediaType;
import org.springframework.test.context.junit4.SpringRunner;
import org.springframework.test.web.servlet.MockMvc;
import org.springframework.test.web.servlet.request.MockMvcRequestBuilders;
import static org.springframework.test.web.servlet.result.MockMvcResultMatchers.status;
import static org.springframework.test.web.servlet.result.MockMvcResultMatchers.content;
import static org.hamcrest.CoreMatchers.equalTo;

@RunWith(SpringRunner.class)
@SpringBootTest
@AutoConfigureMockMvc
public class HelloControllerTest {

    @Autowired
    private MockMvc mvc;

    @Test
    public void getHello() throws Exception {
        mvc.perform(MockMvcRequestBuilders.get("/hello").accept(MediaType.APPLICATION_JSON))
                .andExpect(status().isOk())
                .andExpect(content().string(equalTo("สวัสดีชาวโลก")));
    }
}- @SpringBootTest เป็นตัวที่บอกว่าเราใช้ Framework การ Test ของ SpringBoot
- @AutoConfigureMockMvc เป็นตัวบอกว่า MockMVC ใช้ค่าตั้งต้นครับ ไม่ต้องอ่าน Config จาก xml ที่ไหนอีก และตัวแปร mvc จะถูกยิง MockMVC Class เข้าไป เพราะได้กำหนด @Autowired ไว้ครับ
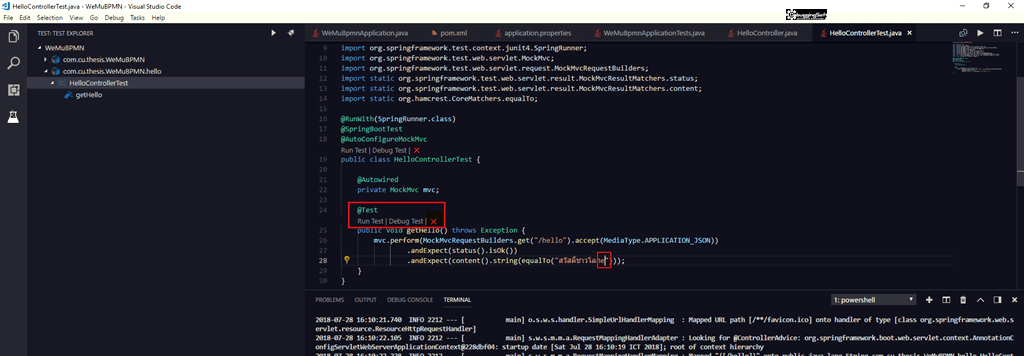
- @Test เป็นตัวบอกว่า Method เป็น Test Case อันหนึ่งของเราครับ โดยใช้ตัว MVCMock เข้ามาช่วยในการดีงค่า และทดสอบผลลัพธ์ที่ได้ครับ โดยทำการดึงค่า
- Status = isOK (Http Response Code 200)
- Content มีค่าเท่ากับ "สวัสดีชาวโลก" ครับ
📌 ลองมารัน Test ครับ สังเกตุดีว่าจะมีเครื่องหมายถูกสีเขียวด้วย

📌 ถ้ามือบอนทำ Fail หละ ผลที่ได้จะเป็นไปตามนี้ครับ
Blog ตอนต่อไปจะเป็น สวัสดีชาวโลก แบบที่มี View แล้ว จะได้มีความสวยงาม ^__^
Discover more from naiwaen@DebuggingSoft
Subscribe to get the latest posts sent to your email.
