หลังจากทำ BPMN ที่เป็น Servicer Task เสร็จและ โดยลองใช้ Mock REST-API จาก http://www.mocky.io เพื่อ POC (Proof of concept) แล้วนั้น สิ่งถัดมาที่ผมทำ คือ ต้องมาลองสร้างข้อมูลให้มัน Dynamic มากก่านี้ครับ ซึ่งผมได้เจอ Open Source ตัวนึงที่น่าสนใจมากครับ แท่นแท๊นนน มัน คือ JSON Server ครับ เป็น Tools ที่เกิดมาเพื่อทำ Mock REST-API โดยแท้เลยครับ มันเลยเป็นที่มาของ Blog ตอนนี้ด้วยครับ
Table of Contents
สิ่งที่ต้องมี
- node.js ครับ เพราะต้องใช้คำสั่ง npm install ครับ ถ้าใครเพิ่งลงก็อย่าลืม Log-off และ Log-on เครื่องใหม่ หรือเอาง่ายสุด Restart เครื่องครับ
- Internet เอาไว้สำหรับ Download Tools ครับ
- data สำหรับ Test ครับ API แต่ละตัว ต้อง Return อะไรมาบ้างครับ
ลุยเลยครับ
- ติดตั้ง JSON Server ด้วยคำสั่ง npm install -g json-server ** ผมใส่ -g เพราะต้องการให้เป็น Global ใช้งานได้กับทั้งเครื่องผมครับ
- รอไปสักพัก
- ทดสอบ โดยการลองพิมพ์ json-server จะพบ help ขึ้นมาครับ
- จะลองส่อง Version ก็ได้ครับ โดยใช้คำสั่ง
json-server --version
สร้าง db.json
- ไฟล์ db.json เป็นไฟล์ที่เก็บข้อมูลการ Mock ของ API แต่ละอันครับ
{
  "requests": [
    {
      "id": 1,
      "projectId": 123,
      "requestId": "CUQ-5248",
      "requestby": "mary",
      "requesttime": "2018-05-23T18:25:43.511Z",
      "requeststatus": "wait-for-proceed",
      "requestitem": [
        {
          "itemname": "DELL Server",
          "itemtype": "goods",
          "itemqty": 2,
          "itemamt": 255000
        },
        {
          "itemname": "DELL Inspiron 5570",
          "itemtype": "goods",
          "itemqty": 10,
          "itemamt": 25000
        },
        {
          "itemname": "ERP System Implementation",
          "itemtype": "services",
          "itemqty": 1,
          "itemamt": 30000
        }
      ]
    },
    {
      "id": 2,
      "projectId": 124,
      "requestId": "CUQ-5249",
      "requestby": "mary",
      "requesttime": "2018-05-23T18:25:43.511Z",
      "requeststatus": "wait-for-proceed",
      "requestitem": [
        {
          "itemname": "DELL Server",
          "itemtype": "goods",
          "itemqty": 2,
          "itemamt": 255000
        },
        {
          "itemname": "DELL Inspiron 5570",
          "itemtype": "goods",
          "itemqty": 10,
          "itemamt": 25000
        },
        {
          "itemname": "ERP System Implementation",
          "itemtype": "services",
          "itemqty": 1,
          "itemamt": 30000
        }
      ]
    },
    {
      "id": 3,
      "projectId": -1,
      "requestId": "-1",
      "requestby": "-",
      "requesttime": "2018-05-23T18:25:43.511Z",
      "requeststatus": "wait-for-proceed",
      "requestitem": []
    }
  ],
  "projects": [
    {
      "id": 123,
      "projectId": 123,
      "avaliableBudget": 30000
    },
    {
      "id": 124,
      "projectId": 124,
      "avaliableBudget": 300000
    }
  ]
}- อย่างไฟล์ตัวอย่างด้านบน มี API ของ requests และ projects ครับ
NOTE: ถ้าสังเกตุดีๆ พบว่ามี Property Id ที่ต้องอยู่ใน db.json อาจจะงงว่าทำต้องใช้ Id เพราะมันเป็ฯที่นิยมในการใช้ครับ แต่จริงๆ มัน Custom ได้จากคำสั่ง json-server --id ครับ
Deploy Mock API
- เมื่อมีไฟล์ db.json แล้ว จะรออะไรหละครับ CD เข้าไปที่ Path ที่เก็บไฟล์ แล้ว Start Server ขึ้นมาเลยครับ ด้วยคำสั่ง json-server --watch db.json ตอนนี้ตัว JSON Server สร้าง API ขึ้นมา 2 ตัวครับ คือ requests และ projects ดังรูปครับ
- ถ้าลองเข้าที่ http://localhost:3000/requests พบข้อมูลที่เรา Mock ไว้ ดังรูปครับ
ทดสอบผ่าน Postman บ้างครับ
- Postman เป็น Tools ที่เข้ามาช่วยจัดการ API-Test เลยครับ
กรณีทดสอบของ Mock API ครับ
- ลองดึงข้อมูล
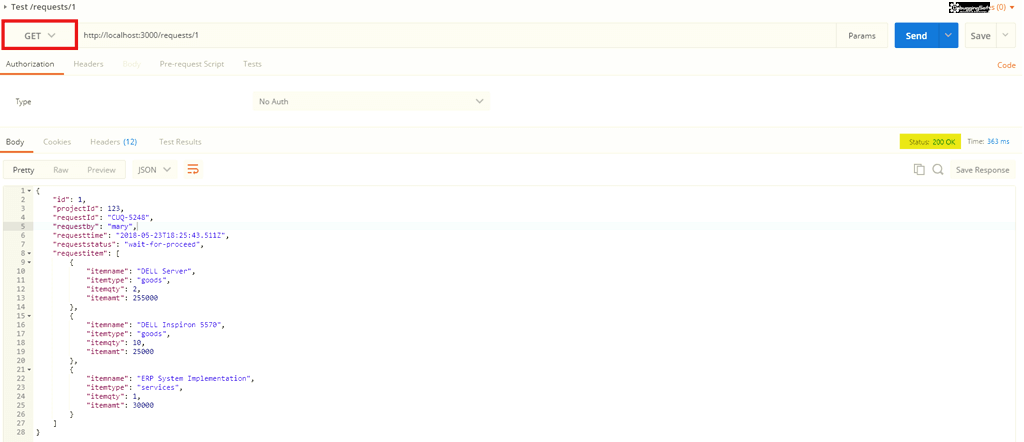
- ดึงข้อมูล requests ตาม id
คำสั่ง GET:http://localhost:3000/requests/1
- ดึงข้อมูล projects ตาม id
คำสั่ง GET:http://localhost:3000/projects/123

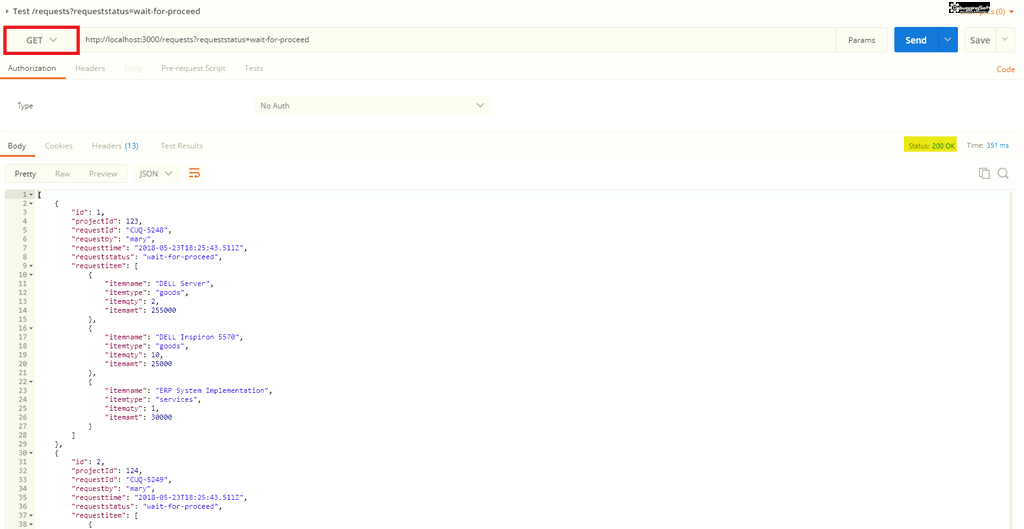
- ดึงข้อมูล request ที่ requeststatus มีค่าเท่ากับ "wait-for-proceed"
คำสั่ง GET:http://localhost:3000/requests?requeststatus=wait-for-proceed
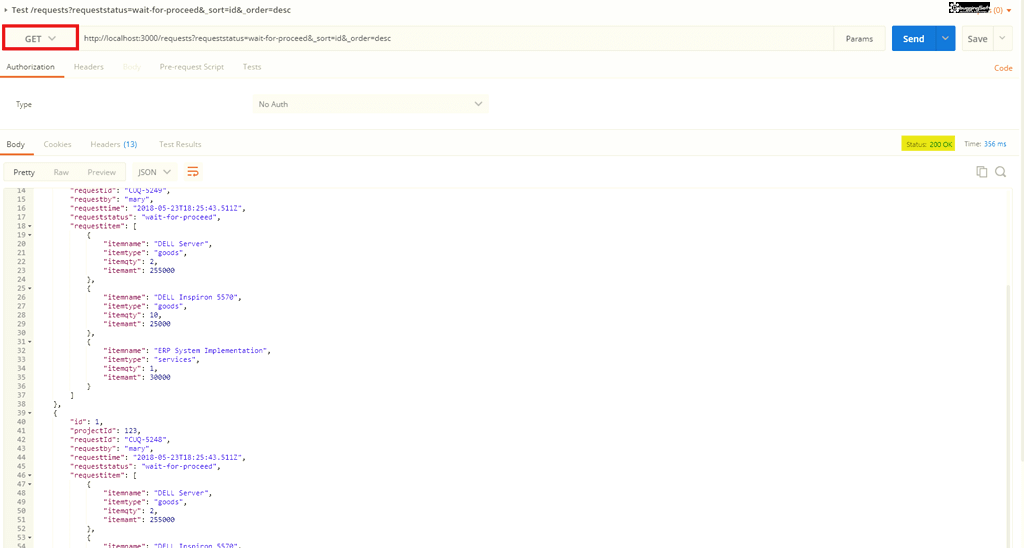
- ดึงข้อมูล request ที่ requeststatus มีค่าเท่ากับ "wait-for-proceed" โดยเรียงตาม Id จาก มากไปน้อย DESC
คำสั่ง GET:http://localhost:3000/requests?requeststatus=wait-for-proceed&_sort=id&_order=desc
- ดึงข้อมูล request ที่ requeststatus มีค่าเท่ากับ "wait-for-proceed" โดยเรียงตาม Id จาก มากไปน้อย ASC ที่ละ 1 รายการ
คำสั่ง GET:http://localhost:3000/requests?requeststatus=wait-for-proceed&_sort=id&_order=asc&_limit=1
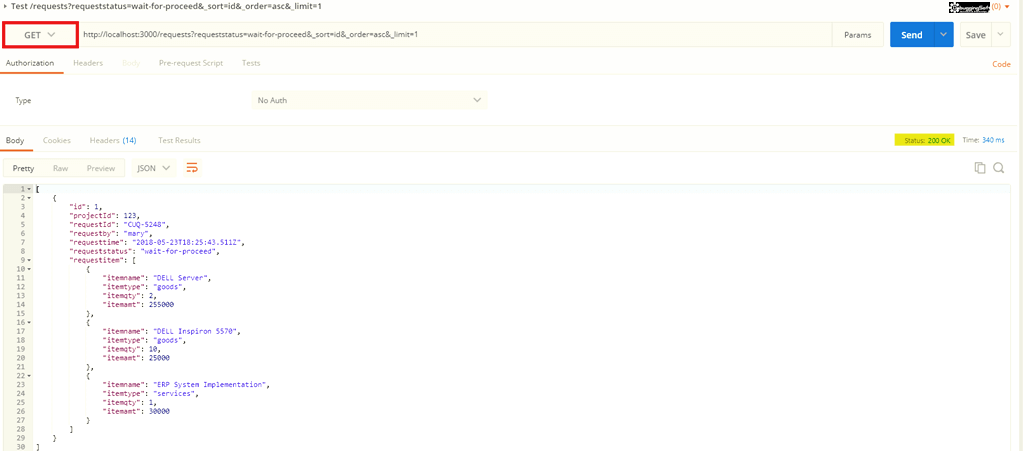
- Update ข้อมูล request ที่ Id = 1 ให้ requeststatus มีค่าเท่ากับ "completed"
- คำสั่ง PATCH:
http://localhost:3000/requests/1
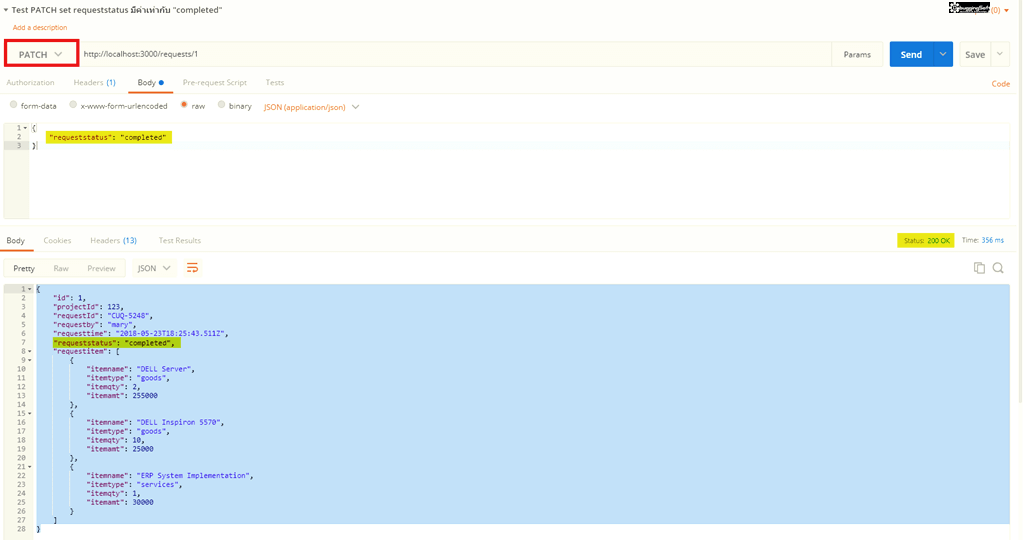
จากอันเมื่อกี้จริงๆ ส่งคำสั่ง PUT ก็ได้นะ แต่ PUT ต้องส่งไปทั้ง Object เท่านั้น โดย Object ที่ส่งไป
- ถ้า PATCH
{
    "requeststatus": "completed"
}- ถ้า PUT
{
    "id": 1,
    "projectId": 123,
    "requestId": "CUQ-5248",
    "requestby": "mary",
    "requesttime": "2018-05-23T18:25:43.511Z",
    "requeststatus": "completed",
    "requestitem": [
        {
            "itemname": "DELL Server",
            "itemtype": "goods",
            "itemqty": 2,
            "itemamt": 255000
        },
        {
            "itemname": "DELL Inspiron 5570",
            "itemtype": "goods",
            "itemqty": 10,
            "itemamt": 25000
        },
        {
            "itemname": "ERP System Implementation",
            "itemtype": "services",
            "itemqty": 1,
            "itemamt": 30000
        }
    ]
}
- Request เพิ่ม ข้อมูลบ้าง
- คำสั่ง POST:
http://localhost:3000/requests/
ปล. ต้องส่งข้อมูลไปทั้ง Object
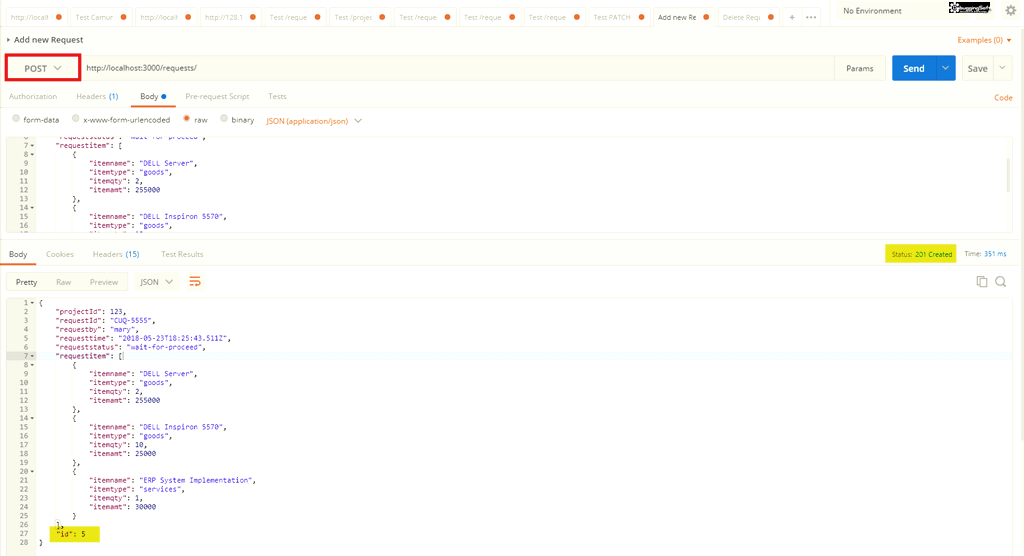
NOTE: พวก PATCH / POST / PUT อย่าลืมกำหนด Content-Type ด้วยนะครับ

- ลบ Request ที่ Id มีค่าเท่ากับ 5 ออก
- คำสั่ง DELETE:
http://localhost:3000/requests/5

Discover more from naiwaen@DebuggingSoft
Subscribe to get the latest posts sent to your email.
